Linux
Dropbox
13/05/10 22:21 Filed in: Linux
Update 24 May 2010: I have added some more features to Dropbox and I have released my new “Dropoff” over at www.dropoff.me. Get all the latest and greatest there in future!
I have found a great solution to the common problem of sending and receiving files from other sites and research partners, and generally sending large files around the web where email won’t do the trick.
It’s called “Dropbox” and was originally written by the University of Delaware.
I am launching it as a service at work called “Dropoff” in order that people don’t think you are talking about the service provided by www.dropbox.com which is a totally different thing.
The idea is that you don’t even need to login to send a file to a user within your site/company/University/institution, so external people can use it to send files to people in your institution. It can handle arbitrarily large files, there are no fixed limits. If you log in to the Dropbox website, you can send files to people outside your institution. People who cannot log in can only send files to people within your institution. This stops the rest of the world using it to send people to other people who aren’t members of your institution.
I have added various extra features to it:
I have customised it quite a bit just for our site, so if you want a copy of my patched version, along with a guide as to what changes I have made, then please contact me.
I have found a great solution to the common problem of sending and receiving files from other sites and research partners, and generally sending large files around the web where email won’t do the trick.
It’s called “Dropbox” and was originally written by the University of Delaware.
I am launching it as a service at work called “Dropoff” in order that people don’t think you are talking about the service provided by www.dropbox.com which is a totally different thing.
The idea is that you don’t even need to login to send a file to a user within your site/company/University/institution, so external people can use it to send files to people in your institution. It can handle arbitrarily large files, there are no fixed limits. If you log in to the Dropbox website, you can send files to people outside your institution. People who cannot log in can only send files to people within your institution. This stops the rest of the world using it to send people to other people who aren’t members of your institution.
I have added various extra features to it:
- Active Directory AD authentication (to multiple AD sites at once if needed)
- Virus scanning of uploaded files, using ClamAV
I have customised it quite a bit just for our site, so if you want a copy of my patched version, along with a guide as to what changes I have made, then please contact me.
Comments
Resending Unix Mbox Files
Unfortunately someone screwed up the installation of one of our servers so that mail to local addresses was being delivered into /var/spool/mail/ instead of being sent onwards to our SMTP server.
Getting the sendmail.mc correct was the easy bit, there is a simple “null client” sendmail.mc file I wrote years ago which does that nicely.
The hard bit was taking all the Unix mbox files in /var/spool/mail and /var/mail and re-delivering them all to their intended recipients. The bit most people get wrong is the separator between messages. The separator is not a line starting with “From “. The separator is a blank line followed by a line starting with “From “. So I wrote my own script to do it which you are very welcome to download and use.
Getting the sendmail.mc correct was the easy bit, there is a simple
The hard bit was taking all the Unix mbox files in /var/spool/mail and /var/mail and re-delivering them all to their intended recipients. The bit most people get wrong is the separator between messages. The separator is not a line starting with “From “. The separator is a blank line followed by a line starting with “From “. So I wrote my own script to do it which you are very welcome to download and use.
VMware Converter - Converting an Existing Windows System
The Converter is a client/server program, where the converter server runs on ecsvm-admin.ecs and the client can run anywhere, such as win-admin.
Firewall Rules
If the source physical Windows system is in the DMZ, you will need to add a couple of rules to the firewall "Short-Term Rules" section allowing all traffic from ECS-internal to the source host and from the source host to ECS-internal. You should remove these rules again once the conversion has completed.
Starting the Conversion
Start the VMWare Converter Standalone Client program.
IP Address/Name = ecsvm-admin:7443
Username = administrator (or your own sys* username if you are registered on the vSphere with an account).
Password = Windows-infrastructure password
Click the "Convert Machine" button in the toolbar.
Source type = Powered-on machine
Give remote machine full hostname.
Give username and password of a user in the "Administrators" group on the source Windows system, such as the "ECS2000\administrator" account and domain password..
OS Family = Windows.
Next.
It should connect to the source physical system.
If it fails, then give it the IP address of the source physical system instead of the name of it.
If it still fails, then Remote Desktop to the source physical system, download the converter (from browsing the datastores starting at http://ecsvm-admin.ecs.soton.ac.uk/) and install the converter agent (not the client/server setup) onto the source system, then run it again from there.
When it asks for the name of the source system to convert, give it the IP address of the source system (which is the same system you are now running the Converter on).
Tell it to automatically uninstall the files when the import succeeds.
It will then deploy the agent, which takes a few seconds.
VMware Infrastructure server details:
Server = ecsvm-admin
Username = administrator (or your sys* username if you have an account on vSphere).
Password = Windows-infrastructure password (or yours).
Next.
Select host to run the VM on = ecsvm-admin1.ecs.soton.ac.uk.
Virtual machine name = short hostname (eg. major-backup).
Datastore = infrastore1-Vol2 (an infrastore volume with plenty of free space).
Virtual machine version = Version 7.
Next.
Options
Destination Attributes: Name = short hostname, Folder = ecs
Data to copy: Click "Advanced...", then "Target Layout...".
Set all large, non-swap filesystems to "Thin provisioning" (this is "Dynamic disks" in Microsoft speak, where only the disk space in use is actually allocated on disk, used disk space expands as necessary to hold the data, up to the maximum set by the size of the filesystem).
Set the Size of the normal large filesystems (eg. "C:") to a reasonable number, no point in making them huge, most will fit in 60Gbytes.
Switch to the "Source Volumes" tab to see how much space is actually in use at the moment.
Normally set C: to thin provisioning, 60GBytes or more.
It is important not to waste disk space on Flat-provisioned disks that are not going to use all their space. Disk is relatively expensive.
Devices: Numer of processors = 1.
Disk controller = SCSI LSI Logic or SCSI Buslogic.
Memory = usually the default will be fine.
Networks: Network adapters to connect = 1
Set the network for the network adapter to be the same Virtual Machine Network VLAN as the physical machine you are converting.
The new virtual machine will take over the IP address of the physical source machine.
Services: Source Services: switch off services that should not be left running when the VM is created (such as SQL Server or WWW Publishing Service, and Hyper-V services if moving from Hyper-V to VMware). Destination Services: set all Hyper-V services to "Disabled".
Advanced Options: Power on target machine = yes
Power off source machine = yes
Install VMware Tools on the imported virtual machine = yes
Configure guest preferences for the virtual machine = no
Remove System Restore checkpoints on destination = yes
Reconfigure destination virtual machine = yes
Next.
It should now just show you the final option settings and then start the process of converting the host. Wait for the whole process to finish before touching either the source (physical) or destination (virtual) machines.
How long it takes depends on the quantity of data that has to be moved. You can expect about 20 to 25 MBytes/second conversion speed. A machine with about 7GB of used disk takes about 25 minutes to convert.
As the process is run by the Converter Server (running on ecsvm-admin), it doesn't matter if you quit the Windows app used to watch the process, you can track the progress of the conversion from the Converter Windows app running on any PC.
After the Conversion has Finished
Open a console on the new VM.
In the "VM/Guest" menu, install the VM tools. This will insert a CD into the virtual CD drive, what happens then is dependent on the Windows Autoplay preferences in the virtual machine.
This will force a restart of the virtual machine.
Shutdown the virtual machine.
Once the VM has stopped, edit the settings of the VM and choose the middle "Options" tab. In the "VMware Tools" settings, right at the bottom right of the dialog there is an option to "Synchronize guest time with host". Tick this box.
Okay that, then power on the VM.
It should successfully boot.
The VM should now be fully running happily and serving its services to the users.
Now just remove the two temporary firewall rules you added at the start of this process.
VMware Converter - Converting an Existing Linux System
The Converter is a client/server program, where the converter server runs on ecsvm-admin.ecs and the client can run anywhere, such as win-admin.
Firewall Rules
If the source physical Linux system is in the DMZ, you will need to add a couple of rules to the firewall "Short-Term Rules" section allowing all traffic from ECS-internal to the source host and from the source host to ECS-internal. You should remove these rules again once the conversion has completed.
Before You Start
On the final virtual machine, you will need to install the VMware tools and set the VM settings to synchronise the time on the VM with that of the ecsvm-admin server. So you won't want ntpd to be running. Also, you are going to need to reboot the VM at least once after you have converted it, so stop and disable the primary user services (e.g. httpd, mysqld) that are running on the server. You can start up the user services again as the last step after getting the VM Linux system running. So I would start with
service ntpd stop
service httpd stop
service mysqld stop
chkconfig ntpd off
chkconfig httpd off
chkconfig mysqld off
Also, if the physical source machine is actually a Windows 2008 Hyper-V VM, then you will want to do the same to the "inputvsc" service, and copy the seth0 device settings to eth0 (remembering to change the device name in /etc/sysconfig/network-scripts/ifcfg-eth0 after copying the ifcfg-seth0 file onto it) as VMware will use the eth0 device and not the seth0 device.
Once running in VMware, the kernel will need to be able to "probe" the disk controllers in order to be able to find the controller types. So in /boot/grub/grub.conf, edit the kernel command line arguments and remove any settings that set "hda=noprobe" or similar. You don't need to reboot after this change, this will be applied once the VM conversion has finished and VMware starts the new VM.
Starting the Conversion
Start the VMWare Converter Standalone Client program.
IP Address/Name = ecsvm-admin:7443
Username = administrator (or your own sys* username if you are registered on the vSphere with an account).
Password = Windows-infrastructure password
Click the "Convert Machine" button in the toolbar.
Source type = Powered-on machine
Give remote machine full hostname.
Give root username and password.
Next.
VMware Infrastructure server details:
Server = ecsvm-admin
Username = administrator (or your sys* username if you have an account on vSphere).
Password = Windows-infrastructure password (or yours).
Next.
Select host to run the VM on = ecsvm-admin1.ecs.soton.ac.uk.
Virtual machine name = short hostname (eg. gander).
Datastore = infrastore1-Vol2 (an infrastore volume with plenty of free space).
Virtual machine version = Version 7.
Next.
Options
Destination Attributes: Name = short hostname, Folder = ecs
Data to copy: Click "Advanced...", then "Target Layout...".
Set all large, non-swap filesystems to "Thin provisioning" (this is "Dynamic disks" in Microsoft speak, where only the disk space in use is actually allocated on disk, used disk space expands as necessary to hold the data, up to the maximum set by the size of the filesystem).
Set the Size of the normal large filesystems (eg. "/") to a reasonable number, no point in making them huge, most will fit in 40Gbytes.
Switch to the "Source Volumes" tab to see how much space is actually in use at the moment.
Normally set / to thin provisioning, 40GBytes, leave /boot and swap alone.
Devices: Numer of processors = 1.
Disk controller = SCSI LSI Logic or SCSI Buslogic.
Memory = usually the default will be fine.
Networks: Network adapters to connect = 1
Set the network for the network adapter to be the same Virtual Machine Network VLAN as the physical machine you are converting.
The new virtual machine will take over the IP address of the physical source machine.
Advanced Options: Power on target machine = yes
Power off source machine = yes
Reconfigure destination virtual machine = yes
Helper VM Network: Look up the IP address of the host "ecsvm--helper" which is a spare IP address unused by anything else in the same "" as the physical host you are converting. There are currently hosts defined such as "ecsvm-systems-helper", "ecsvm-dmz-helper" and "ecsvm-servers-helper". The IP configuration parameters and DNS setup for the Helper VM Network must all be consistent with its IP address. This "helper" machine is a temporary system setup by the VMware Converter just for use during the process of converting a Linux box, it disappears again at the end.
Next.
It should now just show you the final option settings and then start the process of converting the host. Wait for the whole process to finish before touching either the source (physical) or destination (virtual) machines.
How long it takes depends on the quantity of data that has to be moved. You can expect about 20 to 25 MBytes/second conversion speed. A machine with about 7GB of used disk takes about 25 minutes to convert.
As the process is run by the Converter Server (running on ecsvm-admin), it doesn't matter if you quit the Windows app used to watch the process, you can track the progress of the conversion from the Converter Windows app running on any PC.
After the Conversion has Finished
Open a console on the new VM.
In the "VM/Guest" menu, install the VM tools.
mount /dev/cdrom /mnt
cd /tmp
tar xzf /mnt/VM*
umount /mnt
cd vmware*
./vmware-tools-install.pl
Accept all the defaults. It will find suitable modules for your kernel, or else will compile them itself, and build a new initrd, grub.conf and modprobe.conf for your kernel.
Assuming that succeeded, then
shutdown -h now
Once the VM has stopped, edit the settings of the VM and choose the middle "Options" tab. In the "VMware Tools" settings, right at the bottom right of the dialog there is an option to "Synchronize guest time with host". Tick this box.
Okay that, then power on the VM.
It should successfully boot.
The only remaining tasks are to enable and start up the user services, but not ntpd.
chkconfig mysqld on
chkconfig httpd on
service mysqld start
service httpd start
The VM should now be fully running happily and serving its services to the users. If you prefer, you can always reboot the VM again instead of running those last two "service ... start" commands to prove it is all okay and booting correctly.
Now just remove the two temporary firewall rules you added at the start of this process.
Firewall Rules
If the source physical Linux system is in the DMZ, you will need to add a couple of rules to the firewall "Short-Term Rules" section allowing all traffic from ECS-internal to the source host and from the source host to ECS-internal. You should remove these rules again once the conversion has completed.
Before You Start
On the final virtual machine, you will need to install the VMware tools and set the VM settings to synchronise the time on the VM with that of the ecsvm-admin server. So you won't want ntpd to be running. Also, you are going to need to reboot the VM at least once after you have converted it, so stop and disable the primary user services (e.g. httpd, mysqld) that are running on the server. You can start up the user services again as the last step after getting the VM Linux system running. So I would start with
service ntpd stop
service httpd stop
service mysqld stop
chkconfig ntpd off
chkconfig httpd off
chkconfig mysqld off
Also, if the physical source machine is actually a Windows 2008 Hyper-V VM, then you will want to do the same to the "inputvsc" service, and copy the seth0 device settings to eth0 (remembering to change the device name in /etc/sysconfig/network-scripts/ifcfg-eth0 after copying the ifcfg-seth0 file onto it) as VMware will use the eth0 device and not the seth0 device.
Once running in VMware, the kernel will need to be able to "probe" the disk controllers in order to be able to find the controller types. So in /boot/grub/grub.conf, edit the kernel command line arguments and remove any settings that set "hda=noprobe" or similar. You don't need to reboot after this change, this will be applied once the VM conversion has finished and VMware starts the new VM.
Starting the Conversion
Start the VMWare Converter Standalone Client program.
IP Address/Name = ecsvm-admin:7443
Username = administrator (or your own sys* username if you are registered on the vSphere with an account).
Password = Windows-infrastructure password
Click the "Convert Machine" button in the toolbar.
Source type = Powered-on machine
Give remote machine full hostname.
Give root username and password.
Next.
VMware Infrastructure server details:
Server = ecsvm-admin
Username = administrator (or your sys* username if you have an account on vSphere).
Password = Windows-infrastructure password (or yours).
Next.
Select host to run the VM on = ecsvm-admin1.ecs.soton.ac.uk.
Virtual machine name = short hostname (eg. gander).
Datastore = infrastore1-Vol2 (an infrastore volume with plenty of free space).
Virtual machine version = Version 7.
Next.
Options
Destination Attributes: Name = short hostname, Folder = ecs
Data to copy: Click "Advanced...", then "Target Layout...".
Set all large, non-swap filesystems to "Thin provisioning" (this is "Dynamic disks" in Microsoft speak, where only the disk space in use is actually allocated on disk, used disk space expands as necessary to hold the data, up to the maximum set by the size of the filesystem).
Set the Size of the normal large filesystems (eg. "/") to a reasonable number, no point in making them huge, most will fit in 40Gbytes.
Switch to the "Source Volumes" tab to see how much space is actually in use at the moment.
Normally set / to thin provisioning, 40GBytes, leave /boot and swap alone.
Devices: Numer of processors = 1.
Disk controller = SCSI LSI Logic or SCSI Buslogic.
Memory = usually the default will be fine.
Networks: Network adapters to connect = 1
Set the network for the network adapter to be the same Virtual Machine Network VLAN as the physical machine you are converting.
The new virtual machine will take over the IP address of the physical source machine.
Advanced Options: Power on target machine = yes
Power off source machine = yes
Reconfigure destination virtual machine = yes
Helper VM Network: Look up the IP address of the host "ecsvm-
Next.
It should now just show you the final option settings and then start the process of converting the host. Wait for the whole process to finish before touching either the source (physical) or destination (virtual) machines.
How long it takes depends on the quantity of data that has to be moved. You can expect about 20 to 25 MBytes/second conversion speed. A machine with about 7GB of used disk takes about 25 minutes to convert.
As the process is run by the Converter Server (running on ecsvm-admin), it doesn't matter if you quit the Windows app used to watch the process, you can track the progress of the conversion from the Converter Windows app running on any PC.
Open a console on the new VM.
In the "VM/Guest" menu, install the VM tools.
mount /dev/cdrom /mnt
cd /tmp
tar xzf /mnt/VM*
umount /mnt
cd vmware*
./vmware-tools-install.pl
Accept all the defaults. It will find suitable modules for your kernel, or else will compile them itself, and build a new initrd, grub.conf and modprobe.conf for your kernel.
Assuming that succeeded, then
shutdown -h now
Once the VM has stopped, edit the settings of the VM and choose the middle "Options" tab. In the "VMware Tools" settings, right at the bottom right of the dialog there is an option to "Synchronize guest time with host". Tick this box.
Okay that, then power on the VM.
It should successfully boot.
The only remaining tasks are to enable and start up the user services, but not ntpd.
chkconfig mysqld on
chkconfig httpd on
service mysqld start
service httpd start
The VM should now be fully running happily and serving its services to the users. If you prefer, you can always reboot the VM again instead of running those last two "service ... start" commands to prove it is all okay and booting correctly.
Now just remove the two temporary firewall rules you added at the start of this process.
Install VMware Tools on a Linux Client
First, log in to the VM as root and "yum update".
Then "yum install gcc make binutils kernel-devel kernel-headers".
Then reboot the VM.
Then start up the vSphere Client, right click on the VM and choose Guest - Install VMware Tools.
Back into the VM's root session.
mount /dev/cdrom /mnt
cd /tmp
tar xzf /mnt/VM*
umount /mnt
cd vmware-tools-distrib
./vmware-install.pl
Accept all the defaults, and let it do everything it wants. If you have a fully updated and correct system, it should install flawlessly.
Check the "ifconfig -a" and ensure that all the network devices that exist have startup scripts in /etc/sysconfig/network-scripts/ifcfg-eth*.
Go into the vSphere Client again and right-click on the VM. Look in the "Guest" sub-menu and tell it to stop installing the VMware Tools if it offers you that.
Reboot the VM.
If you have problems...
The most likely problem is that you are running an el5xen kernel or some other xen kernel, which you don't want to be doing.
Once you've done a yum update, take the xen kernel you are running (uname -a will tell you) and do something like this:
yum install kernel-2.6.18-164.el5
Then edit /boot/grub/grub.conf and ensure that the "default=" setting at the top is set to boot the kernel you just installed and not the xen kernel (they start numbering from the top of the file from 0).
Then reboot so you are running the non-xen kernel.
Then
yum install kernel-devel-2.6.18-164.el5
Then re-run /tmp/vmware-tools-distrib/vmware-install.pl and if it asks you for the kernel headers location, give it
/usr/src/kernels/2.6.18-164.el5/include
But you will most likely find that it just happily works on its own!
Then just reboot to pick up all the VMware tools in a fresh boot.
VMware Converter Fails for Linux Client
You need to change the installed SCSI controller to be a LSI Logic controller. The original machine may have been configured for a Transtec 3Ware SCSI controller.
The main relevant article is here:
http://tipstricksandmore.blogspot.com/2009/01/after-converting-physical-rhel4-system.html
Once the VM has been converted, you can change the hardware of the VM in the "Edit Settings..." menu from right-clicking on the VM. You can only change it when the VM is powered off.
Edit the VM settings and connect the DVD drive to a "Datastore ISO File": infra1-localDisk/vSphere Management Assistant/rhel-5-server-i386-dvd.iso.
Set the Device Status to "Connected" and "Connect at power on".
In the VM options page, set it to go into the BIOS setup at next boot.
Open a console on the VM and power it on. It will go into the BIOS setup.
In the "Boot" BIOS menu, select the DVD drive and press + to move it to the top.
Save and exit the BIOS setup.
It will boot from DVD.
Enter "linux rescue".
You don't need any network interfaces.
Let it look for the installed system to mount under /mnt/sysimage.
chroot /mnt/sysimage
Replace hda with sda in /etc/fstab, /boot/grub/device.map and /boot/grub/grub.conf
grub-install /dev/sda
Make sure /etc/modules.conf is empty or non-existent.
Edit /etc/modprobe.conf and set
alias eth0 pcnet32
alias eth1 pcnet32
alias scsi_hostadapter mptbase
alias scsi_hostadapter1 mptscsih
Work out the full path to the initrd image you are going to rebuild. They are in /boot and are called initrd*.
The /boot/grub/grub.conf will point to the right one.
So in my example it is "/boot/initrd-2.6.18-128.7.1.el5xen.img".
There should be a directory under /lib/modules called the same version number.
Then you use a command like this to rebuild it
mkinitrd -v -f /boot/initrd-2.6.18-128.7.1.el5xen.img 2.6.18-128.7.1.el5xen
exit
reboot
Press Esc to get the boot menu and force it to boot from the hard disk.
Hopefully it will boot this time!
Shut it down again, edit the VM settings and set the DVD drive back to "Client Device".
Boot your VM normally.
Anti-Phishing and Spear-Phishing Version 2
Update 11 October 2009: This has now been moved to www.ScamNailer.com. Please check there for all future information and updates to this package.
Update 20 September 2009: The Google-hosted data file has been moved to SourceForge, so I have updated the URL it downloads it from. You need to update your script to the new version 2.05.
Update 16 June 2009: I have changed the rule structures to make them considerably faster than the old ones. Download the updated script from the link below.
I have acquired a new reliable feed of email addresses used in phishing attacks. These addresses have all been checked by real people, and they come from a very reliable and well-known source.
The new data file is provided by means of DNS and an Anycast network, which makes it pretty resilient to attack. The previous spear-phishing data is gathered from the project hosted by Google in the traditional way, that hasn’t changed.
I have updated my script so that it fetches both sets of data. It makes use of a temporary directory under /var/cache, which is configurable at the start of the script, and which needs to be writable by the user the scripts runs as (normally just ‘root’ so this doesn’t present any problem at all to most people).
You can download version 2.05 of the script.
If you are not using MailScanner with this script, you will need to comment out or delete the line that mentions “service MailScanner reload” about 1/3 of the way down the script (search and ye shall find!).
For more explanation of this whole problem and the way this script works, please refer back to my earlier article.
Mouse support in Hyper-V
This is how to add mouse support to the LICs (Linux Integration Components) provided by Microsoft. This does not involve using the Beta version of the LICs at all, it is all done with the production release version.
Firstly install everything else involved in getting the LICs working. There is another article in this blog that will explain how to get the LICs working with RedHat or CentOS 5.2.
On your Windows 2008 or Hyper-V server, download the “inputvsc.iso” from http://www.xen.org/download/satori.html.
Using the Hyper-V “Connect” window and its Media menu, set the DVD drive to point to the “inputvsc.iso” you just downloaded.
In the virtual machine, “mkdir /mnt” and “mount /dev/hdc /mnt”. That should mount the ISO on /mnt.
Make somewhere to put it, such as “mkdir -p /opt/inputdriver”.
Copy the contents of the ISO to there, “cp -pr /mnt/* /opt/inputdriver”.
Unmount the ISO, “umount /mnt”.
Eject the media using the Media menu in the Hyper-V “Connect” window.
Go into that directory, “cd /opt/inputdriver”.
Install one required package, “yum install xorg-x11-server-sdk”.
Install the mouse driver, “perl setup.pl inputdriver”.
That should succeed.
Start X Windows with “startx” to test it. If the mouse support doesn’t work, you can always kill X by pressing Ctrl-Alt-Backspace, or by logging in remotely to the virtual machine as root and typing “killall X”.
That’s about it. It worked fine for me!
Anti Spear Phishing
Update 2009-October-11: This package is now hosted at www.scamnailer.com. Please check there for all future information and updates.
Update 2009-June-15: There is now a brand new additional data feed of known phishing email addresses, which I have added to my script.
Spear phishing is a technique used by spammers and scammers to try to get your email username and password. They send you an email claiming to be from your email provider, in which they say that your account will be deleted unless you supply them with your username and password “for authentication” or some other similar ruse.
If they get your username and password, they then use your email account and email provider to send out millions of spam messages. Because the spam comes from a genuine email system (yours!) it will be accepted by most sites and will automatically pass many spam checks.
I have written a script which takes a file of addresses commonly used in these attacks. It also allows an additional list of addressed you can add to. From these, it generates a set of SpamAssassin rules that detect the presence of these addresses, which can be used in MailScanner to stop the spear-phishing attacks completely.
Download the script here. Note that the script is gzipped to ensure your browser doesn’t do anything silly when fetching it, so you’ll need to “gunzip” it before doing anything with it. To start with, just copy it into your “/etc/cron.hourly” directory, and run the command “chmod a+rx /etc/cron.hourly/Spear.Phishing.Rules” to make it run every hour.
It is pretty much a finished script, and is directly usable by you guys without you having to do much to it except read the settings at the top and tweak the filenames if you want to change where it puts things.
I have taken a lot of care to ensure that this won't match any false alarms, I don't just dumbly look for the strings in any surrounding text, which certain commercial AV vendors have been caught doing in the past!
I make a suggestion in the comments at the top of the script about how I use the rule within MailScanner, you probably want to do something similar, and not just delete anything that matches, just in case you do get any false alarms.
It also looks for numbers at the end of the username bit of the address, and assumes that these are numbers which the scammers may change; so if it finds them, it replaces them with a pattern that will match any number instead. There's starting to be a lot of this about, as it's the easiest way for the scammers to try to defeat simple address lists targeted against them, while still being able to remember what addresses they have to check for replies from your dumb users. I thought I would make it a tiny bit harder for them...
You can also add addresses of your own (which can include "*" as a wildcard character to mean "any series of valid characters" in the email address), one address per line, in an optional extra file. Again, read the top of the script and you'll see it mentioned there. That file is optional, it doesn't matter if it doesn't exist. As a starter, you might want to put
m i c h a e l l o u c a s * @ g m a i l . c o m
(without the extra spaces) in that file, as it will nicely catch a lot of "Job opportunity" spams.
It looks for any of these addresses appearing **anywhere** in the message, not just in the headers. So if you start talking to people about these addresses, don't be surprised when the messages get caught by the trap.
It does a "wget", so make sure you have that binary installed, or else change the script to fetch the file by some other means.
The very end of the script does a "service MailScanner restart", so if you need some other command to restart MailScanner or your SpamAssassin setup, then edit it for your system. It needs to be a "restart" and not a "reload" as I have to force it to re-build the database of SpamAssassin rules. If you don’t use MailScanner, but do use “spamd” in some setup or other, then a simple “service spamd restart” would do at the end of the script.
My aim was that, on a RedHat system running MailScanner, you could just copy the script into /etc/cron.hourly and make it executable, and it will just get on with the job for you. I do advise you read the bit in the script about "SpamAssassin Rule Actions" though.
Please do let me know how you would like me to improve it, and tell me what you think of it in general. (be polite, now!)
Update 13th January 2009:
A colleague on the MailScanner mailing list has made this simpler to use. You don’t have the flexibility of adding your own addresses to the list, but you can get the latest list along with all your regular SpamAssassin updates with the “sa-update” command.
Here are his instructions:
wget http://www.bastionmail.co.uk/spear.txt
sa-update --import spear.txt
Add “spear.bastionmail.com” to the list of channels that you update from (either add “--channel spear.bastionmail.com” to your sa-update command, or add “spear.bastionmail.com” to the file pointed to by the sa-update “--channelfile” command-line option).
Add the key “06EF70A3” to the trusted keys (either add “--gpgkey 06EF70A3” to your sa-update command, or add “06EF70A3” to the file pointed to by the sa-update “--gpgkeyfile” command-line option).
Then these SpamAssassin rules will be automatically updated every time your system runs the “sa-update” command, which is daily on a standard MailScanner system.
Update 2009-June-15: There is now a brand new additional data feed of known phishing email addresses, which I have added to my script.
Spear phishing is a technique used by spammers and scammers to try to get your email username and password. They send you an email claiming to be from your email provider, in which they say that your account will be deleted unless you supply them with your username and password “for authentication” or some other similar ruse.
If they get your username and password, they then use your email account and email provider to send out millions of spam messages. Because the spam comes from a genuine email system (yours!) it will be accepted by most sites and will automatically pass many spam checks.
I have written a script which takes a file of addresses commonly used in these attacks. It also allows an additional list of addressed you can add to. From these, it generates a set of SpamAssassin rules that detect the presence of these addresses, which can be used in MailScanner to stop the spear-phishing attacks completely.
Download the script here. Note that the script is gzipped to ensure your browser doesn’t do anything silly when fetching it, so you’ll need to “gunzip” it before doing anything with it. To start with, just copy it into your “/etc/cron.hourly” directory, and run the command “chmod a+rx /etc/cron.hourly/Spear.Phishing.Rules” to make it run every hour.
It is pretty much a finished script, and is directly usable by you guys without you having to do much to it except read the settings at the top and tweak the filenames if you want to change where it puts things.
I have taken a lot of care to ensure that this won't match any false alarms, I don't just dumbly look for the strings in any surrounding text, which certain commercial AV vendors have been caught doing in the past!
I make a suggestion in the comments at the top of the script about how I use the rule within MailScanner, you probably want to do something similar, and not just delete anything that matches, just in case you do get any false alarms.
It also looks for numbers at the end of the username bit of the address, and assumes that these are numbers which the scammers may change; so if it finds them, it replaces them with a pattern that will match any number instead. There's starting to be a lot of this about, as it's the easiest way for the scammers to try to defeat simple address lists targeted against them, while still being able to remember what addresses they have to check for replies from your dumb users.
You can also add addresses of your own (which can include "*" as a wildcard character to mean "any series of valid characters" in the email address), one address per line, in an optional extra file. Again, read the top of the script and you'll see it mentioned there. That file is optional, it doesn't matter if it doesn't exist. As a starter, you might want to put
m i c h a e l l o u c a s * @ g m a i l . c o m
(without the extra spaces) in that file, as it will nicely catch a lot of "Job opportunity" spams.
It looks for any of these addresses appearing **anywhere** in the message, not just in the headers. So if you start talking to people about these addresses, don't be surprised when the messages get caught by the trap.
It does a "wget", so make sure you have that binary installed, or else change the script to fetch the file by some other means.
The very end of the script does a "service MailScanner restart", so if you need some other command to restart MailScanner or your SpamAssassin setup, then edit it for your system. It needs to be a "restart" and not a "reload" as I have to force it to re-build the database of SpamAssassin rules. If you don’t use MailScanner, but do use “spamd” in some setup or other, then a simple “service spamd restart” would do at the end of the script.
My aim was that, on a RedHat system running MailScanner, you could just copy the script into /etc/cron.hourly and make it executable, and it will just get on with the job for you. I do advise you read the bit in the script about "SpamAssassin Rule Actions" though.
Please do let me know how you would like me to improve it, and tell me what you think of it in general. (be polite, now!)
Update 13th January 2009:
A colleague on the MailScanner mailing list has made this simpler to use. You don’t have the flexibility of adding your own addresses to the list, but you can get the latest list along with all your regular SpamAssassin updates with the “sa-update” command.
Here are his instructions:
wget http://www.bastionmail.co.uk/spear.txt
sa-update --import spear.txt
Add “spear.bastionmail.com” to the list of channels that you update from (either add “--channel spear.bastionmail.com” to your sa-update command, or add “spear.bastionmail.com” to the file pointed to by the sa-update “--channelfile” command-line option).
Add the key “06EF70A3” to the trusted keys (either add “--gpgkey 06EF70A3” to your sa-update command, or add “06EF70A3” to the file pointed to by the sa-update “--gpgkeyfile” command-line option).
Then these SpamAssassin rules will be automatically updated every time your system runs the “sa-update” command, which is daily on a standard MailScanner system.
Hyper-V CentOS 5.2 Distributions
Update: 22nd May 2009 - This does not work with CentOS 5.3 or RedHat 5.3.
Update: 29th December 2008 - I have compacted the original vhd files rather better, and the total download for each version is now about 2.3 Gbytes.
To make life easier for everyone, I have put together a couple of VHD files for Hyper-V that contain a pre-built x86 and x86_64 (x64) distribution of CentOS 5.2 including pre-installed Linux Integration Components. They are fully patched up to date, including the latest kernel version available, as of Christmas 2008.
The root password for each of them is the word “password” (without the quotes).
To construct each one, go to the relevant directories for
the x86 (32-bit)
or x64 (64-bit)
versions and download all the zip files in the directory.
Unpack each zip file and you will have a string of files partaa, partab, partac and so on.
On a Windows system you can join these together into the .vhd file with the command (in a normal Command Prompt window)
x86: copy /B partaa+partab+partac+partad+partae+partaf+partag+partah+partai+partaj+partak+partal CentOS5.2.x86.vhd
(all of that should be on one line)
x64: copy /B partaa+partab+partac+partad+partae+partaf+partag+partah+partai+partaj+partak+partal CentOS5.2.x64.vhd
(all of that should be on one line)
You should end up with a single .vhd file with the following size:
x86: 16173279232 bytes
x64: 18433592832 bytes
Then just build a virtual machine around each one with the .vhd file as the IDE hard disk, and with a Network Adapter (not a Legacy Network Adapter) in it.
Remember that the root password is the word “password” (without the quotes).
You will need to edit these files
and then run the command “setup” to configure the IP address and so on of the “seth0” network device. Then just reboot and you’re away.
If you need a graphical interface with a mouse and such, then change the “3” to a “5” in the “default” line in /etc/inittab and reboot. But I would advise leaving it in text-only mode.
Update: 29th December 2008 - I have compacted the original vhd files rather better, and the total download for each version is now about 2.3 Gbytes.
To make life easier for everyone, I have put together a couple of VHD files for Hyper-V that contain a pre-built x86 and x86_64 (x64) distribution of CentOS 5.2 including pre-installed Linux Integration Components. They are fully patched up to date, including the latest kernel version available, as of Christmas 2008.
The root password for each of them is the word “password” (without the quotes).
To construct each one, go to the relevant directories for
the x86 (32-bit)
or x64 (64-bit)
versions and download all the zip files in the directory.
Unpack each zip file and you will have a string of files partaa, partab, partac and so on.
On a Windows system you can join these together into the .vhd file with the command (in a normal Command Prompt window)
x86: copy /B partaa+partab+partac+partad+partae+partaf+partag+partah+partai+partaj+partak+partal CentOS5.2.x86.vhd
(all of that should be on one line)
x64: copy /B partaa+partab+partac+partad+partae+partaf+partag+partah+partai+partaj+partak+partal CentOS5.2.x64.vhd
(all of that should be on one line)
You should end up with a single .vhd file with the following size:
x86: 16173279232 bytes
x64: 18433592832 bytes
Then just build a virtual machine around each one with the .vhd file as the IDE hard disk, and with a Network Adapter (not a Legacy Network Adapter) in it.
Remember that the root password is the word “password” (without the quotes).
You will need to edit these files
- /etc/hosts
- /etc/resolv.conf
- /etc/sysconfig/network
and then run the command “setup” to configure the IP address and so on of the “seth0” network device. Then just reboot and you’re away.
If you need a graphical interface with a mouse and such, then change the “3” to a “5” in the “default” line in /etc/inittab and reboot. But I would advise leaving it in text-only mode.
Speeding Up Ext3 Filesystems
02/12/08 15:22 Filed in: Linux
There are a few things you can do to speed up the ext3 filesystem, and when combined they make a lot of difference!
Firstly, you probably don’t need to store the “last accessed” time of every file and/or every directory, so add “noatime,nodiratime” to the mount options in /etc/fstab (add a comma then that text straight after the word “defaults” in the relevant line of /etc/fstab).
Furthermore, you can optimise the caching of data in the filesystem by adding “data=writeback” to the mount options in /etc/fstab. This is pretty safe as long as your system isn’t very busy and liable to lose power without warning. The only downside is that should it lose power while writing to the disk, a few files may end up with slightly old content in them.
The last one is a little more complicated, but well worth doing. You can change the directories to be B-trees instead of lists, which are a lot faster if you have many files in each directory. Say your filesystem is mounted off /dev/sdb1, for example.
- Unmount the filesystem, having stopped all processes that are using it, with “umount /dev/sdb1”.
- Change the directory indexing with “tune2fs -O dir_index /dev/sdb1”.
- Re-build all the existing directories with “e2fsck -D /dev/sdb1”.
- Reboot, or else remount the filesystem and start the processes back up. Rebooting is simpler
- That should make your filesystem run a whole lot faster!
MailScanner Watermarks from Exchange Server 2007
29/08/08 10:33 Filed in: MailScanner | Exchange Server 2007
Someone has written a very handy utility for Exchange Server 2007 so that it can generate MailScanner-compatible “watermarks”. This means that you don’t need to send all your outgoing mail through a MailScanner server just to get the watermark added. The watermarks are added so that when you get a bounce notification (a DSN), MailScanner knows that it generated the original mail, and will therefore let the bounce error message through. By default, MailScanner will delete bounce notifications that it didn’t generate, as these are spam on the whole.
It is all documented here:
http://ifyoudo.net/post/2008/08/07/MailScannerWatermark-Plugin-For-Microsoft-Exchange-2007.aspx
It is all documented here:
http://ifyoudo.net/post/2008/08/07/MailScannerWatermark-Plugin-For-Microsoft-Exchange-2007.aspx
Hyper-V Linux Integration Components RC2 Download
To make it easy to find, the RC2 of the Microsoft Windows Server 2008 Hyper-V Linux Integration Components can be found here: Linux-IC-RC2.
Speeding Up ext3 Filesystems
22/07/08 12:13 Filed in: Linux
There are a few things you can do to speed up the operation of ext3 filesystems, by changing some of the ways in which it behaves by default.
This is all for /dev/sda1, change it to suit the partition you are working with. Make sure you have an ext3 filesystem on there already, and ensure you have unmounted the filesystem first.
umount /dev/sda1
tune2fs -Ohas_journal -o journal_data_writeback /dev/sda1
tune2fs -O dir_index /dev/sda1
e2fsck -D /dev/sda1
Add ",noatime,nodiratime" to the list of options in the relevant line in /etc/fstab.
mount /dev/sda1
Hyper-V Linux Integration Components in x86_64 and x86 CentOS and RHEL
22/07/08 11:53 Filed in: Hyper-V | Windows Server 2008
Update: 16th February 2010: Added “unifdef” to the list of required RPMs to build the kernel.
Update: 10th September 2008: This page has been updated for the final release version of the Linux Integration Components.
Update: 19th September 2008: This page has been updated for CentOS and RedHat x86_64 and x86 releases, so all 4 variations are covered.
Update: 2nd December 2008: Link to Hyper-V Tools updated to 1.0 finally.
Update: 22nd May 2009: This does not work with CentOS 5.3 or RedHat 5.3.
This page tells you how to install the Windows Server 2008 virtualization Hyper-V Linux Integration Components in CentOS and RHEL (RedHat Enterprise Linux) 5. I initially did it all in x86_64 (or x64) as it is much more interesting and useful. There are also notes below about setting it up on 32-bit systems where there are differences.
Installing the ICs in CentOS 5.2 or RHEL 5.2 is rather harder than in SuSE 10.
By the time you reach the end of this guide, you will be able to use the RedHat or CentOS “setup” program and /etc/sysconfig/network-scripts/ifcfg-eth0 and ifcfg-seth0 files to set your seth0 interface as the primary interface to use in the virtual machine.
You need to copy the code off the CDROM ISO image, so let’s start by doing that. Using the “Media” menu in the Hyper-V “Connect...” window, choose “DVD Drive”, “Insert Disk...” and select the Linux Integration Components ISO image, usually called “LinuxIC.iso”. Then
mkdir -p /mnt/cdrom
mount /dev/cdrom /mnt/cdrom
cp -rp /mnt/cdrom /opt/linux_ic
umount /mnt/cdrom
I strongly advise at this point that you make sure you have the latest patches and updates on your system, so do “yum update“.
Next, get the kernel source for the exact version of kernel you are using. “rpm -q kernel” will tell you what kernel you have. Remember that a “yum update” may change the kernel version. For this example HOWTO, “rpm -q kernel” produced “kernel-2.6.18-92.el5” so my kernel source RPM will be “kernel-2.6.18-92.el5.src.rpm”.
Once you have the the kernel version, go and find the kernel source SRPM.
RedHat: You can get this from ftp://ftp.redhat.com/pub/redhat/linux/enterprise/5Server/en/os/SRPMS/kernel-2.6.18-92.el5.src.rpm.
CentOS: You can get this from ftp://mirrorservice.org/sites/mirror.centos.org/5.2/updates/SRPMS/kernel-2.6.18-92.1.10.el5.src.rpm.
You will obviously have to get networking working using the legacy network adapter so that you can reach ftp.redhat.com to fetch this file.
yum install redhat-rpm-config gcc rpm-build make gnupg unifdef
If you are not sure, run that command anyway, it will not do any harm if you already have the packages installed.
Install the SRPM with the command
rpm -ivh kernel-*.src.rpm
which will get you the full kernel source in /usr/src/redhat/SOURCES (along with all RedHat’s patches) and the spec file in /usr/src/redhat/SPECS/kernel-2.6.spec. You need to edit the spec file, so make a backup copy of it first for safety.
Before the “%build” line, insert this line:
64-bit systems: patch -p1 -d ../linux-%{kversion}.%{_target_cpu} < /opt/linux_ic/patch/x2v-x64-rhel.patch
32-bit systems: patch -p1 -d ../linux-%{kversion}.%{_target_cpu} < /opt/linux_ic/patch/x2v-x32-rhel.patch
You also want to only build the “xen” version of the kernel. So find the line that defined “%define with_xen” and change it to
%define with_xen 1
and the line containing “%define with_xenonly”, if there is one, needs to be changed to
%define with_xenonly 1
You can now build the RPM, which will construct the xen one which is what you need. So
cd /usr/src/redhat/SPECS
64-bit systems: rpmbuild -ba kernel-2.6.spec
32-bit systems: rpmbuild -ba --target i686 kernel-2.6.spec
Be warned, this will take *hours* on a on a virtual machine.
If, shortly after that starts, you get an error about “Not enough random bytes available” then do this to make some more entropy:
1. Press Ctrl-Z
2. Run the command “du / ; grep -r hello /“
3. Let this run for 30 seconds or so, then press Ctrl-C
4. Run the command “fg”
5. If nothing happens immediately, go back to step 1, just above, and try again.
32-bit systems: cd /usr/src/redhat/RPMS/i686
rpm -ivh kernel-xen-2*rpm
rpm -Uvh kernel-xen-devel-2*rpm
If either of those “rpm” commands give any errors, add “--force” to the command and run it again.
Build the x2v version of the kernel
cd /opt/linux_ic
perl setup.pl x2v /boot/grub/grub.conf
Check the /boot/grub/grub.conf file, especially the “kernel” line, but no changes should be needed on simple RedHat 64-bit single-operating-system setups.
64-bit systems: The first section of the file should look like this:
title Red Hat Enterprise Linux Server (2.6.18-92.el5xen)
root (hd0,0)
kernel /x2v-64.gz
module /vmlinuz-2.6.18-92.el5xen ro root=/dev/VolGroup00/LogVol00 rhgb quiet
module /initrd-2.6.18-92.el5xen.img
32-bit systems: The first section of the file should look like this:
title Red Hat Enterprise Linux Server (2.6.18-92.el5xen)
root (hd0,0)
kernel /x2v-pae.gz
module /vmlinuz-2.6.18-92.el5xen ro root=/dev/VolGroup00/LogVol00 rhgb quiet
module /initrd-2.6.18-92.el5xen.img
Now double-check the “kernel” line, and make sure it says “pae” and not “32”.
Reboot, and it should boot your newly built kernel with the X2V shims in place.
To fix the “build” link, make it point into the kernel source that you have been building from, with something like this:
cd /lib/modules/`uname -r`
ln -nsf /usr/src/kernels/`uname -r`-`arch` build
Note: Please note that in the preceding commands, the quotes are single backquotes, not apostrophes or anything else.
RedHat systems:
cd /opt/linux_ic
perl setup.pl drivers
CentOS systems:
cd /opt/linux_ic
Edit setup.pl and look for the string “kernel-devel”. Change that to “kernel-xen-devel” and save the file.
perl setup.pl drivers
You should now have the drivers running. If you have added a network adapter (not a “Legacy Network Adapter&rdquo to your virtual machine, you should find that “ifconfig -a” outputs a new network device “seth0”. When you reboot, the vmbus module willl automatically be started, along with the other synthetic device drivers, such as the SCSI storage driver and the network driver.
Update: 10 Sept 2008: This step does not appear to be required
To build a new initrd image, so that all the correct drivers are detected every time your virtual machine boots, you need to do this (note this is one very long command, all on one line):
mkinitrd -f --preload vmbus --preload storvsc --preload netvsc --preload blkvsc --force-ide-probe --force-scsi-probe --force-lvm-probe /boot/initrd-2.6.18-92.el5xen.img 2.6.18-92.el5xen
Update: 10 Sept 2008: This section does not appear to be required
yum install xorg-x11-server-sdk xorg-x11-proto-devel
Note that for that “yum” command to work with RedHat Linux, you must be subscribed to their update service so that you can fetch the package, or else you will have to go and find them on your installation DVD/CDs.
Then
cd /opt/linux_ic
cd drivers/dist
make inputvsc_install
At this point, you might want to reboot to be sure that your new network devices are configured how you expected at boot time, and that any SCSI disks specified in /etc/fstab are mounted as you expected.
You now have the same ICs running in CentOS 5.2 or RHEL 5.2 as Microsoft intended to run in SuSE Linux.
Update: 10th September 2008: This page has been updated for the final release version of the Linux Integration Components.
Update: 19th September 2008: This page has been updated for CentOS and RedHat x86_64 and x86 releases, so all 4 variations are covered.
Update: 2nd December 2008: Link to Hyper-V Tools updated to 1.0 finally.
Update: 22nd May 2009: This does not work with CentOS 5.3 or RedHat 5.3.
This page tells you how to install the Windows Server 2008 virtualization Hyper-V Linux Integration Components in CentOS and RHEL (RedHat Enterprise Linux) 5. I initially did it all in x86_64 (or x64) as it is much more interesting and useful. There are also notes below about setting it up on 32-bit systems where there are differences.
Installing the ICs in CentOS 5.2 or RHEL 5.2 is rather harder than in SuSE 10.
Configuring the Virtual Machine
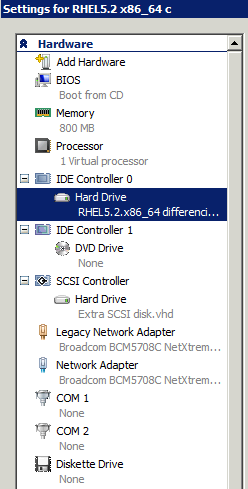
Using the Hyper-V Manager, edit the settings of your new RHEL or CentOS virtual machine, and add a Network Adapter (in addition to the Legacy Network Adapter you already have) and a SCSI Controller with a Hard Drive attached to it. Ensure the Network Adapter is assigned to the virtual network that contains your physical external network card. The hardware settings window should look similar to this:By the time you reach the end of this guide, you will be able to use the RedHat or CentOS “setup” program and /etc/sysconfig/network-scripts/ifcfg-eth0 and ifcfg-seth0 files to set your seth0 interface as the primary interface to use in the virtual machine.
Fetching the Tools
You first need to fetch a copy of the ISO image from the zip of the Linux Integration Components.You need to copy the code off the CDROM ISO image, so let’s start by doing that. Using the “Media” menu in the Hyper-V “Connect...” window, choose “DVD Drive”, “Insert Disk...” and select the Linux Integration Components ISO image, usually called “LinuxIC.iso”. Then
mkdir -p /mnt/cdrom
mount /dev/cdrom /mnt/cdrom
cp -rp /mnt/cdrom /opt/linux_ic
umount /mnt/cdrom
I strongly advise at this point that you make sure you have the latest patches and updates on your system, so do “yum update“.
Next, get the kernel source for the exact version of kernel you are using. “rpm -q kernel” will tell you what kernel you have. Remember that a “yum update” may change the kernel version. For this example HOWTO, “rpm -q kernel” produced “kernel-2.6.18-92.el5” so my kernel source RPM will be “kernel-2.6.18-92.el5.src.rpm”.
Once you have the the kernel version, go and find the kernel source SRPM.
RedHat: You can get this from ftp://ftp.redhat.com/pub/redhat/linux/enterprise/5Server/en/os/SRPMS/kernel-2.6.18-92.el5.src.rpm.
CentOS: You can get this from ftp://mirrorservice.org/sites/mirror.centos.org/5.2/updates/SRPMS/kernel-2.6.18-92.1.10.el5.src.rpm.
You will obviously have to get networking working using the legacy network adapter so that you can reach ftp.redhat.com to fetch this file.
Building the Kernel
In order to install and build the kernel, there are a few packages you need to ensure you have installed. If you installed everything, then don’t worry. If you didn’t, then you will find you will need to do this, which should install all the packages you actually need:yum install redhat-rpm-config gcc rpm-build make gnupg unifdef
If you are not sure, run that command anyway, it will not do any harm if you already have the packages installed.
Install the SRPM with the command
rpm -ivh kernel-*.src.rpm
which will get you the full kernel source in /usr/src/redhat/SOURCES (along with all RedHat’s patches) and the spec file in /usr/src/redhat/SPECS/kernel-2.6.spec. You need to edit the spec file, so make a backup copy of it first for safety.
Before the “%build” line, insert this line:
64-bit systems: patch -p1 -d ../linux-%{kversion}.%{_target_cpu} < /opt/linux_ic/patch/x2v-x64-rhel.patch
32-bit systems: patch -p1 -d ../linux-%{kversion}.%{_target_cpu} < /opt/linux_ic/patch/x2v-x32-rhel.patch
You also want to only build the “xen” version of the kernel. So find the line that defined “%define with_xen” and change it to
%define with_xen 1
and the line containing “%define with_xenonly”, if there is one, needs to be changed to
%define with_xenonly 1
You can now build the RPM, which will construct the xen one which is what you need. So
cd /usr/src/redhat/SPECS
64-bit systems: rpmbuild -ba kernel-2.6.spec
32-bit systems: rpmbuild -ba --target i686 kernel-2.6.spec
Be warned, this will take *hours* on a on a virtual machine.
If, shortly after that starts, you get an error about “Not enough random bytes available” then do this to make some more entropy:
1. Press Ctrl-Z
2. Run the command “du / ; grep -r hello /“
3. Let this run for 30 seconds or so, then press Ctrl-C
4. Run the command “fg”
5. If nothing happens immediately, go back to step 1, just above, and try again.
Installing the Kernel
64-bit systems: cd /usr/src/redhat/RPMS/x86_6432-bit systems: cd /usr/src/redhat/RPMS/i686
rpm -ivh kernel-xen-2*rpm
rpm -Uvh kernel-xen-devel-2*rpm
If either of those “rpm” commands give any errors, add “--force” to the command and run it again.
Build the x2v version of the kernel
cd /opt/linux_ic
perl setup.pl x2v /boot/grub/grub.conf
Check the /boot/grub/grub.conf file, especially the “kernel” line, but no changes should be needed on simple RedHat 64-bit single-operating-system setups.
64-bit systems: The first section of the file should look like this:
title Red Hat Enterprise Linux Server (2.6.18-92.el5xen)
root (hd0,0)
kernel /x2v-64.gz
module /vmlinuz-2.6.18-92.el5xen ro root=/dev/VolGroup00/LogVol00 rhgb quiet
module /initrd-2.6.18-92.el5xen.img
32-bit systems: The first section of the file should look like this:
title Red Hat Enterprise Linux Server (2.6.18-92.el5xen)
root (hd0,0)
kernel /x2v-pae.gz
module /vmlinuz-2.6.18-92.el5xen ro root=/dev/VolGroup00/LogVol00 rhgb quiet
module /initrd-2.6.18-92.el5xen.img
Now double-check the “kernel” line, and make sure it says “pae” and not “32”.
Reboot, and it should boot your newly built kernel with the X2V shims in place.
Building the Hypervisor, Network and Storage Drivers
The next step is to build the drivers. There are a problem that needs fixing first, the “build” link in the /lib/modules/ directory will be broken, and you need a module build environment.To fix the “build” link, make it point into the kernel source that you have been building from, with something like this:
cd /lib/modules/`uname -r`
ln -nsf /usr/src/kernels/`uname -r`-`arch` build
Note: Please note that in the preceding commands, the quotes are single backquotes, not apostrophes or anything else.
Build the Drivers
RedHat systems:
cd /opt/linux_ic
perl setup.pl drivers
CentOS systems:
cd /opt/linux_ic
Edit setup.pl and look for the string “kernel-devel”. Change that to “kernel-xen-devel” and save the file.
perl setup.pl drivers
You should now have the drivers running. If you have added a network adapter (not a “Legacy Network Adapter&rdquo
Update: 10 Sept 2008: This step does not appear to be required
To build a new initrd image, so that all the correct drivers are detected every time your virtual machine boots, you need to do this (note this is one very long command, all on one line):
mkinitrd -f --preload vmbus --preload storvsc --preload netvsc --preload blkvsc --force-ide-probe --force-scsi-probe --force-lvm-probe /boot/initrd-2.6.18-92.el5xen.img 2.6.18-92.el5xen
Update: 10 Sept 2008: This section does not appear to be required
Building the X Mouse Driver
The last step is to build the mouse driver for use by X. This is very simple, you just need to install a couple of extra packages withyum install xorg-x11-server-sdk xorg-x11-proto-devel
Note that for that “yum” command to work with RedHat Linux, you must be subscribed to their update service so that you can fetch the package, or else you will have to go and find them on your installation DVD/CDs.
Then
cd /opt/linux_ic
cd drivers/dist
make inputvsc_install
That’s it!
You can now use the “setup” command to configure the networking and then edit the /etc/sysconfig/network-scripts/ifcfg-*eth* files to configure the new “seth0” interface to start on boot, and configure the old legacy “eth0” interface to not start on boot (set “ONBOOT=no” in /etc/sysconfig/network-scripts/ifcfg-eth0).At this point, you might want to reboot to be sure that your new network devices are configured how you expected at boot time, and that any SCSI disks specified in /etc/fstab are mounted as you expected.
You now have the same ICs running in CentOS 5.2 or RHEL 5.2 as Microsoft intended to run in SuSE Linux.
Extracting OLE Objects from Word Documents
12/06/08 18:12 Filed in: Linux
Many people have asked me how to extract the file embedded inside an OLE object that has been inserted into a Microsoft Word document, or similar.
I reverse-engineered the file format, it’s very simple. Not this code doesn’t always appear to work, but it gets 95% of them out.
Use it at your own peril. Please credit me (Julian Field jules@jules.fm) where/when/if you use this code or any derivative of it, including translations into other languages.
$byte = "";
$buffer = "";
#$infh = new FileHandle;
#sysopen $infh, "$explodeinto/$inname", O_RDONLY;
Open the infh filehandle with the "inname" file containing the OLE object.
sysseek $infh, 6, SEEK_SET; # Skip 1st 6 bytes
Skip the first 6 bytes, these appear to be useless
$outname = "";
$finished = 0;
$length = 0;
until ($byte eq "\0" || $finished || $length>1000) {
# Read a C-string into $outname
sysread($infh, $byte, 1) or $finished = 1;
$outname .= $byte;
$length++;
}
Read a null-terminated string of bytes,
this becomes the output filename.
next OLEFILE if $length>1000; # Bail out if it went wrong
If the filename was way too long, this is probably corrupt.
$finished = 0;
$byte = 1;
$length = 0;
until ($byte eq "\0" || $finished || $length>1000) { # Throw away a C-string
sysread($infh, $byte, 1) or $finished = 1;
$length++;
}
Throw away the next null-terminated string of bytes.
next OLEFILE if $length>1000; # Bail out if it went wrong
If the string was way too long, this is probably corrupt.
sysseek $infh, 4, Fcntl::SEEK_CUR or next OLEFILE; # Skip next 4 bytes
Skip the next 4 bytes of the file.
sysread $infh, $number, 4 or next OLEFILE;
$number = unpack 'V', $number;
Read the next 4 bytes into a 4-byte int called "$number".
#print STDERR "Skipping $number bytes of header filename\n";
if ($number>0 && $number<1_000_000) {
sysseek $infh, $number, Fcntl::SEEK_CUR; # Skip the next bit of header (C-string)
} else {
next OLEFILE;
}
If the number $number was a reasonable size,
skip that many bytes of the file.
sysread $infh, $number, 4 or next OLEFILE;
$number = unpack 'V', $number;
Read the next 4 bytes in a 4-byte int called "$number".
This is the length of the real embedded file we want to extract.
#print STDERR "Reading $number bytes of file data\n";
sysread $infh, $buffer, $number
if $number>0 && $number < $size; # Sanity check
Read the $number number of bytes into memory into a chunk
of memory allocated which is at least $number bytes long.
Do a sanity check that the number of bytes we have asked it to read
is less than the total length of the input file.
$outfh = new FileHandle;
$outsafe = $this->MakeNameSafe($outname, $explodeinto);
sysopen $outfh, "$explodeinto/$outsafe", (O_CREAT | O_WRONLY)
or next OLEFILE;
Create an output file with a filename which is a sanitised safe
version of the filename we read at the top of this bit of code.
if ($number>0 && $number<1_000_000_000) { # Number must be reasonable!
syswrite $outfh, $buffer, $number or next OLEFILE;
}
close $outfh;
If the output file is less than 1Gbyte long, write out the data we just read.
This creates the file containing the embedded file we wanted to extract.
Then close that output file.
Talking from sendmail to Exchange over SMTP auth
05/06/08 09:42 Filed in: Exchange Server 2007 | Email
There are various things you can do in Exchange, such as control who can address distribution lists, that can be restricted to authenticated senders only. So how do you make your sendmail box an authenticated sender?
Start at http://www.sendmail.org/~ca/email/auth.html -- about half way down it starts talking about “Using sendmail as a client with AUTH”. That tells you how to setup your sendmail box (which is the client) so that it talks SMTP auth to Exchange (which is the server).
Start at http://www.sendmail.org/~ca/email/auth.html -- about half way down it starts talking about “Using sendmail as a client with AUTH”. That tells you how to setup your sendmail box (which is the client) so that it talks SMTP auth to Exchange (which is the server).
RedHat 5.2 yum update errors
04/06/08 17:21 Filed in: Linux
If you install RedHat 5.2 and try to do a “yum update” command, you get loads of errors about libxslt and libvorbis.
To solve these errors, type the following commands before you do a “yum update”.
# rpm -e --nodeps --allmatches libvorbis
# rpm -e --nodeps --allmatches libxslt-python libxslt-devel
# rpm -e --nodeps --allmatches libxslt
# rpm -e --nodeps --allmatches libvorbis-devel
# yum -y install libvorbis libxslt
Then you will find that “yum update” works as expected.
X in Solaris 10 on a MacBook
Section "ServerLayout"
Identifier "X.org Configured"
Screen 0 "Screen0" 0 0
InputDevice "Mouse0" "CorePointer"
InputDevice "Keyboard0" "CoreKeyboard"
EndSection
Section "Files"
RgbPath "/usr/X11/lib/X11/rgb"
ModulePath "/usr/X11/lib/modules"
FontPath "/usr/X11/lib/X11/fonts/TrueType/"
FontPath "/usr/X11/lib/X11/fonts/Type1/"
FontPath "/usr/X11/lib/X11/fonts/Type1/sun/"
FontPath "/usr/X11/lib/X11/fonts/F3bitmaps/"
FontPath "/usr/X11/lib/X11/fonts/misc/"
FontPath "/usr/X11/lib/X11/fonts/100dpi/"
FontPath "/usr/X11/lib/X11/fonts/75dpi/"
EndSection
Section "Module"
Load "IA"
Load "Xst"
Load "dbe"
Load "extmod"
Load "record"
Load "xtrap"
Load "glx"
Load "bitstream"
Load "type1"
EndSection
Section "InputDevice"
Identifier "Keyboard0"
Driver "keyboard"
EndSection
Section "InputDevice"
Identifier "Mouse0"
Driver "mouse"
Option "Protocol" "auto"
Option "Device" "/dev/mouse"
EndSection
Section "Monitor"
Identifier "Monitor0"
VendorName "Monitor Vendor"
ModelName "Monitor Model"
ModeLine "MacBook13" 172.73 1280 1336 1616 1728 800 802 814 840
EndSection
Section "Device"
### Available Driver options are:-
### Values: : integer,: float, : "True"/"False",
###: "String", : " Hz/kHz/MHz"
### [arg]: arg optional
#Option "ShadowFB" # []
#Option "DefaultRefresh" # []
Identifier "Card0"
Driver "vesa"
VendorName "Unknown Vendor"
BoardName "Unknown Board"
BusID "PCI:0:2:0"
EndSection
Section "Screen"
Identifier "Screen0"
Device "Card0"
Monitor "Monitor0"
SubSection "Display"
Viewport 0 0
Virtual 1280 800
Depth 1
Modes "1280x800"
# Modes "MacBook13"
EndSubSection
SubSection "Display"
Viewport 0 0
Virtual 1280 800
Depth 4
Modes "1280x800"
# Modes "MacBook13"
EndSubSection
SubSection "Display"
Viewport 0 0
Virtual 1280 800
Depth 8
Modes "1280x800"
# Modes "MacBook13"
EndSubSection
SubSection "Display"
Viewport 0 0
Virtual 1280 800
Depth 15
Modes "1280x800"
# Modes "MacBook13"
EndSubSection
SubSection "Display"
Viewport 0 0
Virtual 1280 800
Depth 16
Modes "1280x800"
# Modes "MacBook13"
EndSubSection
SubSection "Display"
Viewport 0 0
Virtual 1280 800
Depth 24
Modes "1280x800"
# Modes "MacBook13"
EndSubSection
EndSection
# Option "dpms"
#EndSection
#
#Section "Device"
# Identifier "Videocard0"
# Driver "vesa"
# VendorName "Videocard vendor"
# BoardName "VESA driver (generic)"
#EndSection
#
#Section "Screen"
# Identifier "Screen0"
# Device "Videocard0"
# Monitor "Monitor0"
# DefaultDepth 24
# SubSection "Display"
# Viewport 0 0
# Virtual 1280 800
# Depth 8
# Modes "MacBook13"
# EndSubSection
# SubSection "Display"
# Viewport 0 0
# Virtual 1280 800
# Depth 16
# Modes "MacBook13"
# EndSubSection
# SubSection "Display"
# Viewport 0 0
# Virtual 1280 800
# Depth 24
# Modes "MacBook13"
# EndSubSection
#EndSection
#
#Section "DRI"
# Group 0
# Mode 0666
#EndSection
Identifier "X.org Configured"
Screen 0 "Screen0" 0 0
InputDevice "Mouse0" "CorePointer"
InputDevice "Keyboard0" "CoreKeyboard"
EndSection
Section "Files"
RgbPath "/usr/X11/lib/X11/rgb"
ModulePath "/usr/X11/lib/modules"
FontPath "/usr/X11/lib/X11/fonts/TrueType/"
FontPath "/usr/X11/lib/X11/fonts/Type1/"
FontPath "/usr/X11/lib/X11/fonts/Type1/sun/"
FontPath "/usr/X11/lib/X11/fonts/F3bitmaps/"
FontPath "/usr/X11/lib/X11/fonts/misc/"
FontPath "/usr/X11/lib/X11/fonts/100dpi/"
FontPath "/usr/X11/lib/X11/fonts/75dpi/"
EndSection
Section "Module"
Load "IA"
Load "Xst"
Load "dbe"
Load "extmod"
Load "record"
Load "xtrap"
Load "glx"
Load "bitstream"
Load "type1"
EndSection
Section "InputDevice"
Identifier "Keyboard0"
Driver "keyboard"
EndSection
Section "InputDevice"
Identifier "Mouse0"
Driver "mouse"
Option "Protocol" "auto"
Option "Device" "/dev/mouse"
EndSection
Section "Monitor"
Identifier "Monitor0"
VendorName "Monitor Vendor"
ModelName "Monitor Model"
ModeLine "MacBook13" 172.73 1280 1336 1616 1728 800 802 814 840
EndSection
Section "Device"
### Available Driver options are:-
### Values: : integer,
###
### [arg]: arg optional
#Option "ShadowFB" # [
#Option "DefaultRefresh" # [
Identifier "Card0"
Driver "vesa"
VendorName "Unknown Vendor"
BoardName "Unknown Board"
BusID "PCI:0:2:0"
EndSection
Section "Screen"
Identifier "Screen0"
Device "Card0"
Monitor "Monitor0"
SubSection "Display"
Viewport 0 0
Virtual 1280 800
Depth 1
Modes "1280x800"
# Modes "MacBook13"
EndSubSection
SubSection "Display"
Viewport 0 0
Virtual 1280 800
Depth 4
Modes "1280x800"
# Modes "MacBook13"
EndSubSection
SubSection "Display"
Viewport 0 0
Virtual 1280 800
Depth 8
Modes "1280x800"
# Modes "MacBook13"
EndSubSection
SubSection "Display"
Viewport 0 0
Virtual 1280 800
Depth 15
Modes "1280x800"
# Modes "MacBook13"
EndSubSection
SubSection "Display"
Viewport 0 0
Virtual 1280 800
Depth 16
Modes "1280x800"
# Modes "MacBook13"
EndSubSection
SubSection "Display"
Viewport 0 0
Virtual 1280 800
Depth 24
Modes "1280x800"
# Modes "MacBook13"
EndSubSection
EndSection
# Option "dpms"
#EndSection
#
#Section "Device"
# Identifier "Videocard0"
# Driver "vesa"
# VendorName "Videocard vendor"
# BoardName "VESA driver (generic)"
#EndSection
#
#Section "Screen"
# Identifier "Screen0"
# Device "Videocard0"
# Monitor "Monitor0"
# DefaultDepth 24
# SubSection "Display"
# Viewport 0 0
# Virtual 1280 800
# Depth 8
# Modes "MacBook13"
# EndSubSection
# SubSection "Display"
# Viewport 0 0
# Virtual 1280 800
# Depth 16
# Modes "MacBook13"
# EndSubSection
# SubSection "Display"
# Viewport 0 0
# Virtual 1280 800
# Depth 24
# Modes "MacBook13"
# EndSubSection
#EndSection
#
#Section "DRI"
# Group 0
# Mode 0666
#EndSection
X in CentOS/RHEL 5 on a MacBook
# Xorg configuration created by pyxf86config
Section "ServerLayout"
Identifier "Default Layout"
Screen 0 "Screen0" 0 0
InputDevice "Keyboard0" "CoreKeyboard"
EndSection
Section "InputDevice"
Identifier "Keyboard0"
Driver "kbd"
Option "XkbModel" "pc105"
Option "XkbLayout" "us"
EndSection
Section "Device"
Identifier "Videocard0"
Driver "vesa"
EndSection
Section "Monitor"
Identifier "Monitor0"
VendorName "MonitorVendor"
ModelName "MonitorModel"
Horizsync 28-50
EndSection
Section "Screen"
Identifier "Screen0"
Device "Videocard0"
Monitor "Monitor0"
DefaultDepth 24
SubSection "Display"
Viewport 0 0
Virtual 1280 800
Modes "1280x800"
Depth 24
EndSubSection
EndSection
X in CentOS/RHEL 4 on a MacBook Pro
# Xorg configuration created by system-config-display
Section "ServerLayout"
Identifier "single head configuration"
Screen 0 "Screen0" 0 0
InputDevice "Mouse0" "CorePointer"
InputDevice "Keyboard0" "CoreKeyboard"
EndSection
Section "Files"
# RgbPath is the location of the RGB database. Note, this is the name of the
# file minus the extension (like ".txt" or ".db"). There is normally
# no need to change the default.
# Multiple FontPath entries are allowed (they are concatenated together)
# By default, Red Hat 6.0 and later now use a font server independent of
# the X server to render fonts.
RgbPath "/usr/X11R6/lib/X11/rgb"
FontPath "unix/:7100"
EndSection
Section "Module"
Load "dbe"
Load "extmod"
Load "fbdevhw"
Load "glx"
Load "record"
Load "freetype"
Load "type1"
Load "dri"
EndSection
Section "InputDevice"
# Specify which keyboard LEDs can be user-controlled (eg, with xset(1))
# Option "Xleds" "1 2 3"
# To disable the XKEYBOARD extension, uncomment XkbDisable.
# Option "XkbDisable"
# To customise the XKB settings to suit your keyboard, modify the
# lines below (which are the defaults). For example, for a non-U.S.
# keyboard, you will probably want to use:
# Option "XkbModel" "pc102"
# If you have a US Microsoft Natural keyboard, you can use:
# Option "XkbModel" "microsoft"
#
# Then to change the language, change the Layout setting.
# For example, a german layout can be obtained with:
# Option "XkbLayout" "de"
# or:
# Option "XkbLayout" "de"
# Option "XkbVariant" "nodeadkeys"
#
# If you'd like to switch the positions of your capslock and
# control keys, use:
# Option "XkbOptions" "ctrl:swapcaps"
# Or if you just want both to be control, use:
# Option "XkbOptions" "ctrl:nocaps"
#
Identifier "Keyboard0"
Driver "kbd"
Option "XkbModel" "pc105"
Option "XkbLayout" "us"
EndSection
Section "InputDevice"
Identifier "Mouse0"
Driver "mouse"
Option "Protocol" "IMPS/2"
Option "Device" "/dev/input/mice"
Option "ZAxisMapping" "4 5"
Option "Emulate3Buttons" "yes"
EndSection
Section "Monitor"
# HorizSync 21.5 - 150.0
# VertRefresh 30.0 - 150.0
Identifier "Monitor0"
VendorName "Monitor Vendor"
ModelName "LCD Panel 1680x1050"
ModeLine "MacBookPro17" 136.3 1680 1720 1856 2096 1050 1053 1056 1084
Option "dpms"
EndSection
Section "Device"
Identifier "Videocard0"
Driver "vesa"
VendorName "Videocard vendor"
BoardName "VESA driver (generic)"
EndSection
Section "Screen"
Identifier "Screen0"
Device "Videocard0"
Monitor "Monitor0"
DefaultDepth 24
SubSection "Display"
Viewport 0 0
Virtual 1680 1050
Depth 8
Modes "MacBookPro17"
EndSubSection
SubSection "Display"
Viewport 0 0
Virtual 1680 1050
Depth 16
Modes "MacBookPro17"
EndSubSection
SubSection "Display"
Viewport 0 0
Virtual 1680 1050
Depth 24
Modes "MacBookPro17"
EndSubSection
EndSection
Section "DRI"
Group 0
Mode 0666
EndSection
X in Ubuntu on a MacBook Pro
# /etc/X11/xorg.conf (xorg X Window System server configuration file)
#
# This file was generated by dexconf, the Debian X Configuration tool, using
# values from the debconf database.
#
# Edit this file with caution, and see the /etc/X11/xorg.conf manual page.
# (Type "man /etc/X11/xorg.conf" at the shell prompt.)
#
# This file is automatically updated on xserver-xorg package upgrades *only*
# if it has not been modified since the last upgrade of the xserver-xorg
# package.
#
# If you have edited this file but would like it to be automatically updated
# again, run the following command:
# sudo dpkg-reconfigure -phigh xserver-xorg
Section "Files"
FontPath "/usr/share/X11/fonts/misc"
FontPath "/usr/share/X11/fonts/cyrillic"
FontPath "/usr/share/X11/fonts/100dpi/:unscaled"
FontPath "/usr/share/X11/fonts/75dpi/:unscaled"
FontPath "/usr/share/X11/fonts/Type1"
FontPath "/usr/share/X11/fonts/100dpi"
FontPath "/usr/share/X11/fonts/75dpi"
FontPath "/usr/share/fonts/X11/misc"
# path to defoma fonts
FontPath "/var/lib/defoma/x-ttcidfont-conf.d/dirs/TrueType"
EndSection
Section "Module"
Load "i2c"
Load "bitmap"
Load "ddc"
Load "dri"
Load "extmod"
Load "freetype"
Load "glx"
Load "int10"
Load "type1"
Load "vbe"
EndSection
Section "InputDevice"
Identifier "Generic Keyboard"
Driver "kbd"
Option "CoreKeyboard"
Option "XkbRules" "xorg"
Option "XkbModel" "pc105"
Option "XkbLayout" "us"
Option "XkbOptions" "lv3:ralt_switch"
EndSection
Section "InputDevice"
Identifier "Configured Mouse"
Driver "mouse"
Option "CorePointer"
Option "Device" "/dev/input/mice"
Option "Protocol" "ExplorerPS/2"
Option "ZAxisMapping" "4 5"
Option "Emulate3Buttons" "true"
EndSection
Section "InputDevice"
Driver "wacom"
Identifier "stylus"
Option "Device" "/dev/wacom" # Change to
# /dev/input/event
# for USB
Option "Type" "stylus"
Option "ForceDevice" "ISDV4" # Tablet PC ONLY
EndSection
Section "InputDevice"
Driver "wacom"
Identifier "eraser"
Option "Device" "/dev/wacom" # Change to
# /dev/input/event
# for USB
Option "Type" "eraser"
Option "ForceDevice" "ISDV4" # Tablet PC ONLY
EndSection
Section "InputDevice"
Driver "wacom"
Identifier "cursor"
Option "Device" "/dev/wacom" # Change to
# /dev/input/event
# for USB
Option "Type" "cursor"
Option "ForceDevice" "ISDV4" # Tablet PC ONLY
EndSection
Section "Device"
Identifier "Videocard0"
Driver "vesa"
VendorName "Videocard Vendor"
BoardName "VESA driver (generic)"
BusID "PCI:0:2:0"
EndSection
Section "Monitor"
Identifier "Monitor0"
Option "DPMS"
ModelName "LCD Panel 1680x1050"
Modeline "MacBookPro17" 136.3 1680 1720 1856 2096 1050 1053 1056 1084
EndSection
Section "Screen"
Identifier "Default Screen"
Device "Videocard0"
Monitor "Monitor0"
DefaultDepth 24
SubSection "Display"
Depth 1
Modes "1024x768" "800x600" "640x480"
EndSubSection
SubSection "Display"
Depth 4
Modes "1024x768" "800x600" "640x480"
EndSubSection
SubSection "Display"
Depth 8
Modes "1024x768" "800x600" "640x480"
EndSubSection
SubSection "Display"
Depth 15
Modes "1024x768" "800x600" "640x480"
EndSubSection
SubSection "Display"
Depth 16
Modes "1024x768" "800x600" "640x480"
EndSubSection
SubSection "Display"
Viewport 0 0
Virtual 1680 1050
Depth 24
Modes "MacBookPro17"
EndSubSection
EndSection
Section "ServerLayout"
Identifier "Default Layout"
Screen "Default Screen"
InputDevice "Generic Keyboard"
InputDevice "Configured Mouse"
InputDevice "stylus" "SendCoreEvents"
InputDevice "cursor" "SendCoreEvents"
InputDevice "eraser" "SendCoreEvents"
EndSection
Section "DRI"
Mode 0666
EndSection
#
# This file was generated by dexconf, the Debian X Configuration tool, using
# values from the debconf database.
#
# Edit this file with caution, and see the /etc/X11/xorg.conf manual page.
# (Type "man /etc/X11/xorg.conf" at the shell prompt.)
#
# This file is automatically updated on xserver-xorg package upgrades *only*
# if it has not been modified since the last upgrade of the xserver-xorg
# package.
#
# If you have edited this file but would like it to be automatically updated
# again, run the following command:
# sudo dpkg-reconfigure -phigh xserver-xorg
Section "Files"
FontPath "/usr/share/X11/fonts/misc"
FontPath "/usr/share/X11/fonts/cyrillic"
FontPath "/usr/share/X11/fonts/100dpi/:unscaled"
FontPath "/usr/share/X11/fonts/75dpi/:unscaled"
FontPath "/usr/share/X11/fonts/Type1"
FontPath "/usr/share/X11/fonts/100dpi"
FontPath "/usr/share/X11/fonts/75dpi"
FontPath "/usr/share/fonts/X11/misc"
# path to defoma fonts
FontPath "/var/lib/defoma/x-ttcidfont-conf.d/dirs/TrueType"
EndSection
Section "Module"
Load "i2c"
Load "bitmap"
Load "ddc"
Load "dri"
Load "extmod"
Load "freetype"
Load "glx"
Load "int10"
Load "type1"
Load "vbe"
EndSection
Section "InputDevice"
Identifier "Generic Keyboard"
Driver "kbd"
Option "CoreKeyboard"
Option "XkbRules" "xorg"
Option "XkbModel" "pc105"
Option "XkbLayout" "us"
Option "XkbOptions" "lv3:ralt_switch"
EndSection
Section "InputDevice"
Identifier "Configured Mouse"
Driver "mouse"
Option "CorePointer"
Option "Device" "/dev/input/mice"
Option "Protocol" "ExplorerPS/2"
Option "ZAxisMapping" "4 5"
Option "Emulate3Buttons" "true"
EndSection
Section "InputDevice"
Driver "wacom"
Identifier "stylus"
Option "Device" "/dev/wacom" # Change to
# /dev/input/event
# for USB
Option "Type" "stylus"
Option "ForceDevice" "ISDV4" # Tablet PC ONLY
EndSection
Section "InputDevice"
Driver "wacom"
Identifier "eraser"
Option "Device" "/dev/wacom" # Change to
# /dev/input/event
# for USB
Option "Type" "eraser"
Option "ForceDevice" "ISDV4" # Tablet PC ONLY
EndSection
Section "InputDevice"
Driver "wacom"
Identifier "cursor"
Option "Device" "/dev/wacom" # Change to
# /dev/input/event
# for USB
Option "Type" "cursor"
Option "ForceDevice" "ISDV4" # Tablet PC ONLY
EndSection
Section "Device"
Identifier "Videocard0"
Driver "vesa"
VendorName "Videocard Vendor"
BoardName "VESA driver (generic)"
BusID "PCI:0:2:0"
EndSection
Section "Monitor"
Identifier "Monitor0"
Option "DPMS"
ModelName "LCD Panel 1680x1050"
Modeline "MacBookPro17" 136.3 1680 1720 1856 2096 1050 1053 1056 1084
EndSection
Section "Screen"
Identifier "Default Screen"
Device "Videocard0"
Monitor "Monitor0"
DefaultDepth 24
SubSection "Display"
Depth 1
Modes "1024x768" "800x600" "640x480"
EndSubSection
SubSection "Display"
Depth 4
Modes "1024x768" "800x600" "640x480"
EndSubSection
SubSection "Display"
Depth 8
Modes "1024x768" "800x600" "640x480"
EndSubSection
SubSection "Display"
Depth 15
Modes "1024x768" "800x600" "640x480"
EndSubSection
SubSection "Display"
Depth 16
Modes "1024x768" "800x600" "640x480"
EndSubSection
SubSection "Display"
Viewport 0 0
Virtual 1680 1050
Depth 24
Modes "MacBookPro17"
EndSubSection
EndSection
Section "ServerLayout"
Identifier "Default Layout"
Screen "Default Screen"
InputDevice "Generic Keyboard"
InputDevice "Configured Mouse"
InputDevice "stylus" "SendCoreEvents"
InputDevice "cursor" "SendCoreEvents"
InputDevice "eraser" "SendCoreEvents"
EndSection
Section "DRI"
Mode 0666
EndSection
Hyper-V beta Linux Integration Components
31/03/08 12:19 Filed in: Hyper-V
Update 31st March 2008: Microsoft have released the RC version of the Linux Integration Components and they are available at https://connect.microsoft.com/Downloads/Downloads.aspx?SiteID=495.
Currently, Microsoft have not made any version of the Linux Integration Components available for Windows Server 2008 Hyper-V virtualisation.
So, as a temporary solution until they get the new version out, I have made a copy available at http://www.jules.fm/hyperv_linux.zip
I don’t think Microsoft can complain much about me doing this, it’s just a temporary solution for the few people who need it now and cannot wait until the new version is released.
Hyper-V Integration Components in x86_64 CentOS and RHEL
02/01/08 12:12 Filed in: Hyper-V
Update 13th July 2008: New version of this HOWTO is available with information on Linux Integration Components RC2.
This page tells you how to install the Windows Server 2008 virtualization Hyper-V Linux Integration Components in CentOS and RHEL (RedHat Enterprise Linux) 5. I did it all in x86_64 (or x64) as it is much more interesting and useful.
Installing the ICs in CentOS 5.1 or RHEL 5.1 is rather harder than in SuSE 10.
You need to copy the code off the CDROM ISO image, so let’s start by doing that:
mkdir -p /mnt/cdrom
mount /dev/cdrom /mnt/cdrom
mkdir /opt/linux_ic
( cd /mnt/cdrom && tar cf - . ) | ( cd /opt/linux_ic && tar xvBpf - )
umount /mnt/cdrom
Next, get the kernel source for the exact version of kernel and kernel-headers you are using. “rpm -qa | grep kernel” will tell you what kernel-headers you have. Remember that a “yum update” may change the kernel version.
Once you have the the kernel version, go and find the kernel source SRPM. You can get this from http://mirrors.centos.org/centos/5/updates/SRPMS/ or http://mirrors.centos.org/centos/5/os/SRPMS/.
Install the SRPM which will get you the full kernel source in /usr/src/redhat/SOURCES (along with all RedHat’s patches) and the spec file in /usr/src/redhat/SPECS. You need to edit the spec file, so make a backup copy of it first. Find the “buildid” definition line, uncomment it, remove the extra space after % and change it to something like
%define buildid .JKF1
The tools supplied with RHEL5 and CentOS 5 are not good enough to build the kernel-headers, due to a lack of support for “unifdef” in GNU make. So find the line that sets “with_headers” and change it to
%define with_headers 0
Just before the “%build” line, you need to add the patch for the Hypervisor code. 2 of the parts of the Microsoft-supplied patch do not apply successfully, due to differences in the source code where it doesn’t match what Microsoft think it is. So do a “rpmbuild -bp kernel-2.6.spec” to build a patched source tree in /usr/src/redhat/BUILD. Then cd into it and try to apply the patch in /opt/linux_ic/patch/. You will find 2 bits of it don’t apply correctly. Look at the .rej file for each failed patch and apply the changes by hand. Copy the 2 manually patched source files to somewhere convenient like /root. Before the “%build” line, add a chunk of shell script that does something like this: (I am assuming here that you know what you’re doing
cd /usr/src/redhat/BUILD/kernel-2.6.18
( patch -p0 < /opt/linux_ic/patch/x2c-x64-sles.patch ; /bin/true )
cp -f /root/head64-xen.c linux-2.6.18.x86_64/arch/x86_64/kernel/
cp -f /root/pgalloc.h linux-2.6.18.x86_64/include/asm-x86_64/mach-xen/asm/
You can now build the RPM, which will construct several kernels, including the xen one which is what you need. So
cd /usr/src/redhat/SPECS
rpmbuild -ba kernel-2.6.spec
Be warned, this will take *hours* on a on a virtual machine.
Now install the xen version of the new kernel:
cd /usr/src/redhat/RPMS/x86_64
rpm -ivh --force kernel-xen-2*.JKF2*rpm
Build the x2v version of the kernel
cd /opt/linux_ic
perl setup.pl x2v /boot/grub/grub.conf
Now you need to fix up the /boot/grub/grub.conf file. For the section that includes the x2v-64 stuff, remove the “/boot” leading path, as all paths must be given relative to /boot. You *do* need the leading “/” though. The final section you get should look like this:
title CentOS (2.6.18-53.1.4.el5.JKF2xen)
root (hd0,0)
kernel /x2v-64.gz
module /vmlinuz-2.6.18-53.1.4.el5.JKF2xen ro root=/dev/VolGroup00/LogVol00 rhgb quiet
module /initrd-2.6.18-53.1.4.el5.JKF2xen.img
I strongly advise you comment out the “hiddenmenu” setting, and set the default to this kernel (they are numbered from 0=start of file).
Now reboot, and it should boot your newly built kernel with the X2V shims in place.
Next step is to build the drivers. There is one problem that needs fixing first, the “build” link in the /lib/modules/ directory will be broken. To fix this, make it point into the kernel source that you have been building from, with something like this:
cd /lib/modules/`uname -r`
ln -nsf /usr/src/rdhat/BUILD/kernel-2.6.18/linux-2.6.18.x86_64 build
Now build the drivers:
cd /opt/linux_ic
perl setup.pl drivers
You should now have the drivers running, and should have just seen the output of the “modprobe vmbus” command. And you should find that “ifconfig” outputs a new network device “seth0”. When you reboot, the vmbus module willl automatically be started. Unfortunately, it loads too late in time for it to be used for the seth0 network interface to be the sole external network interface, nor in time for the SCSI device to mount filesystems stored on virtual SCSI disks. Moving the init.d script to S04vmbus doesn’t help, as kudzu does not see the device and so removes it from the /etc/sysconfig/network-scripts directory. UPDATE -- appears to work okay as a network interface, like on SuSE 10.
If you try to attach the network interface automatically at boot time, you will need to do this after the machine has booted:
service network start
service sshd restart
along with any other network-connected daemons you have started, such as MailScanner or sendmail.
You now have the same ICs running in CentOS 5.1 or RHEL 5 as Microsoft intended to run in SuSE 10.
This page tells you how to install the Windows Server 2008 virtualization Hyper-V Linux Integration Components in CentOS and RHEL (RedHat Enterprise Linux) 5. I did it all in x86_64 (or x64) as it is much more interesting and useful.
Installing the ICs in CentOS 5.1 or RHEL 5.1 is rather harder than in SuSE 10.
You need to copy the code off the CDROM ISO image, so let’s start by doing that:
mkdir -p /mnt/cdrom
mount /dev/cdrom /mnt/cdrom
mkdir /opt/linux_ic
( cd /mnt/cdrom && tar cf - . ) | ( cd /opt/linux_ic && tar xvBpf - )
umount /mnt/cdrom
Next, get the kernel source for the exact version of kernel and kernel-headers you are using. “rpm -qa | grep kernel” will tell you what kernel-headers you have. Remember that a “yum update” may change the kernel version.
Once you have the the kernel version, go and find the kernel source SRPM. You can get this from http://mirrors.centos.org/centos/5/updates/SRPMS/ or http://mirrors.centos.org/centos/5/os/SRPMS/.
Install the SRPM which will get you the full kernel source in /usr/src/redhat/SOURCES (along with all RedHat’s patches) and the spec file in /usr/src/redhat/SPECS. You need to edit the spec file, so make a backup copy of it first. Find the “buildid” definition line, uncomment it, remove the extra space after % and change it to something like
%define buildid .JKF1
The tools supplied with RHEL5 and CentOS 5 are not good enough to build the kernel-headers, due to a lack of support for “unifdef” in GNU make. So find the line that sets “with_headers” and change it to
%define with_headers 0
Just before the “%build” line, you need to add the patch for the Hypervisor code. 2 of the parts of the Microsoft-supplied patch do not apply successfully, due to differences in the source code where it doesn’t match what Microsoft think it is. So do a “rpmbuild -bp kernel-2.6.spec” to build a patched source tree in /usr/src/redhat/BUILD. Then cd into it and try to apply the patch in /opt/linux_ic/patch/. You will find 2 bits of it don’t apply correctly. Look at the .rej file for each failed patch and apply the changes by hand. Copy the 2 manually patched source files to somewhere convenient like /root. Before the “%build” line, add a chunk of shell script that does something like this: (I am assuming here that you know what you’re doing
cd /usr/src/redhat/BUILD/kernel-2.6.18
( patch -p0 < /opt/linux_ic/patch/x2c-x64-sles.patch ; /bin/true )
cp -f /root/head64-xen.c linux-2.6.18.x86_64/arch/x86_64/kernel/
cp -f /root/pgalloc.h linux-2.6.18.x86_64/include/asm-x86_64/mach-xen/asm/
You can now build the RPM, which will construct several kernels, including the xen one which is what you need. So
cd /usr/src/redhat/SPECS
rpmbuild -ba kernel-2.6.spec
Be warned, this will take *hours* on a on a virtual machine.
Now install the xen version of the new kernel:
cd /usr/src/redhat/RPMS/x86_64
rpm -ivh --force kernel-xen-2*.JKF2*rpm
Build the x2v version of the kernel
cd /opt/linux_ic
perl setup.pl x2v /boot/grub/grub.conf
Now you need to fix up the /boot/grub/grub.conf file. For the section that includes the x2v-64 stuff, remove the “/boot” leading path, as all paths must be given relative to /boot. You *do* need the leading “/” though. The final section you get should look like this:
title CentOS (2.6.18-53.1.4.el5.JKF2xen)
root (hd0,0)
kernel /x2v-64.gz
module /vmlinuz-2.6.18-53.1.4.el5.JKF2xen ro root=/dev/VolGroup00/LogVol00 rhgb quiet
module /initrd-2.6.18-53.1.4.el5.JKF2xen.img
I strongly advise you comment out the “hiddenmenu” setting, and set the default to this kernel (they are numbered from 0=start of file).
Now reboot, and it should boot your newly built kernel with the X2V shims in place.
Next step is to build the drivers. There is one problem that needs fixing first, the “build” link in the /lib/modules/
ln -nsf /usr/src/rdhat/BUILD/kernel-2.6.18/linux-2.6.18.x86_64 build
Now build the drivers:
cd /opt/linux_ic
perl setup.pl drivers
You should now have the drivers running, and should have just seen the output of the “modprobe vmbus” command. And you should find that “ifconfig” outputs a new network device “seth0”. When you reboot, the vmbus module willl automatically be started. Unfortunately, it loads too late in time for it to be used for the seth0 network interface to be the sole external network interface, nor in time for the SCSI device to mount filesystems stored on virtual SCSI disks. Moving the init.d script to S04vmbus doesn’t help, as kudzu does not see the device and so removes it from the /etc/sysconfig/network-scripts directory. UPDATE -- appears to work okay as a network interface, like on SuSE 10.
If you try to attach the network interface automatically at boot time, you will need to do this after the machine has booted:
service network start
service sshd restart
along with any other network-connected daemons you have started, such as MailScanner or sendmail.
You now have the same ICs running in CentOS 5.1 or RHEL 5 as Microsoft intended to run in SuSE 10.
Hyper-V Integration Components in SuSE 10
17/12/07 12:10 Filed in: Hyper-V
Make sure you install the Xen kernels in the installation process. Else install them separately, packages are kernel-xen or kernel-xen-pae.
Copy the whole of the LinuxIC.iso to /opt/linux_ic
cd /opt/linux_ic
perl setup.pl x2v /boot/grub/menu.lst
Reboot the VM.
perl setup.pl drivers
Once you’ve done that, “ifconfig” should list the “seth0” ethernet interface; “cat /proc/scsi/scsi” should list the hard disk device. Create a partition with fdisk and mkfs.ext3 /dev/sda1 to build a new partition.
There is also a HAL patch for the device manager in X, but you don’t need that.
If on an x86_64 system, you need to build a new kernel. Do all of this instead of the x2v line above.
Install the kernel_source package.
cd /usr/src/linux
cp /opt/linux_ic/patch/x2v-x64-sles.patch .
patch -l p1 < x2v-x64-sles.patch
cp /boot/config-....-xen .patch
make oldconfig
make vmlinuz
cp vmlinux /boot/vmliuz-...-xen
cd /opt/linux_ic
perl setup.pl x2v /boot/grub/menu.lst
Reboot the VM
perl setup.pl drivers